Hands-On Testing · Part 2
Your first Playwright test in 15 minutes (Python)
ProvaLab team · · 7 min read
In Part 1 we looked at how UI tests work and why Playwright is the tool to start with. Now we build some. By the end you'll have three browser tests running against a real website, and you'll know how to read a failure, record a trace of it, and run the suite automatically.
Everything below was run while writing this post, and the output is pasted in unedited.
What you need: Python 3.10 or newer, a terminal, and about 400 MB of disk for a browser. We'll test provalab.io, our own site. Only ever run UI tests against sites you own or have permission to test; point the examples at your own app when you've got the hang of it.
Step 1: Install Playwright (3 minutes)
Create a folder and a virtual environment, as in Testing Basics Part 5:
mkdir first-ui-test
cd first-ui-test
python3 -m venv .venv
source .venv/bin/activate      # Windows: .venv\Scripts\Activate.ps1
Install the pytest plugin for Playwright, then the browser it will drive:
pip install pytest-playwright
playwright install chromium
The second command downloads a copy of Chromium that Playwright controls. It's separate from the Chrome you browse with, so tests never touch your own cookies or tabs.
Step 2: Point the tests at your site (1 minute)
Create pytest.ini so you don't have to repeat the site address in every test:
[pytest]
addopts = --base-url https://provalab.io
Now page.goto("/blog/") means https://provalab.io/blog/. To test a different site, change this one line.
Step 3: Write three tests (5 minutes)
Create test_blog.py:
import re

from playwright.sync_api import Page, expect


def test_blog_lists_posts(page: Page):
    page.goto("/blog/")
    expect(page.get_by_role("heading", level=1)).to_have_text("ProvaLab Blog")
    expect(page.get_by_test_id("blog-card").first).to_be_visible()


def test_a_post_opens_from_the_list(page: Page):
    page.goto("/blog/")
    page.get_by_test_id("blog-card").first.get_by_role("link").first.click()
    expect(page).to_have_url(re.compile(r"/blog/[a-z0-9-]+/$"))
    expect(page.get_by_role("heading", level=1)).to_be_visible()
    expect(page.get_by_role("link", name="All posts")).to_be_visible()


def test_tour_dialog_opens_and_closes(page: Page):
    page.goto("/")
    button = page.locator("#stage-tms").get_by_role("button", name="Watch the full tour")
    button.scroll_into_view_if_needed()
    button.click()
    dialog = page.get_by_role("dialog", name=re.compile("tour", re.I))
    expect(dialog).to_be_visible()
    page.keyboard.press("Escape")
    expect(dialog).to_be_hidden()
What's going on:
pageis a fixture the plugin provides: a fresh browser tab for every test, closed afterwards. Tests can't leak state into each other.- Locate, act, assert, as in Part 1.
get_by_role("button", name="Watch the full tour")finds the button the way a screen reader would;click()acts;expect(...).to_be_visible()asserts. expectwaits for you. Each assertion retries for up to 5 seconds until the condition is true. That's why there are nosleep()calls, and why these tests won't flake when the network is slow.- The third test checks a real interaction: a button opens a video dialog, and Escape closes it. Checking that something disappears is just as important as checking that it appears.
Step 4: Run them (1 minute)
pytest -v
collected 3 items

test_blog.py::test_blog_lists_posts[chromium] PASSED                     [ 33%]
test_blog.py::test_a_post_opens_from_the_list[chromium] PASSED           [ 66%]
test_blog.py::test_tour_dialog_opens_and_closes[chromium] PASSED         [100%]

======================== 3 passed, 1 warning in 10.68s =========================
Three real pages loaded in a real browser, a dialog opened and closed, in under 11 seconds. The browser ran headless (no window), which is the default and what CI uses.
(The warning is a deprecation notice inside the plugin itself, not in your code. It's safe to ignore.)
Watch it happen
To see the browser while the test runs, slowed down so you can follow:
pytest --headed --slowmo 500
Do this whenever a test confuses you. Nine times out of ten you'll see the problem within seconds: a cookie banner over the button, a page that hasn't finished loading, a locator pointing at the wrong thing.
Step 5: Break one on purpose (3 minutes)
As in Part 5, a test you have never seen fail proves little. Create test_broken.py with a wrong expectation:
from playwright.sync_api import Page, expect


def test_blog_heading_wrong_on_purpose(page: Page):
    page.goto("/blog/")
    expect(page.get_by_role("heading", level=1)).to_have_text("ProvaLab Articles")
pytest test_broken.py
    def test_blog_heading_wrong_on_purpose(page: Page):
        page.goto("/blog/")
>       expect(page.get_by_role("heading", level=1)).to_have_text("ProvaLab Articles")
E       AssertionError: Locator expected to have text 'ProvaLab Articles'
E       Actual value: ProvaLab Blog
E       Call log:
E         - Expect "to_have_text" get_by_role("heading", level=1) with timeout 5000ms
E         - waiting for get_by_role("heading", level=1)
E           14 × locator resolved to <h1 class="text-3xl sm:text-4xl lg:text-5xl font-bold text-gray-900">ProvaLab Blog</h1>
E              - unexpected value "ProvaLab Blog"
E
E       Aria snapshot:
E       - heading "ProvaLab Blog" [level=1]

test_broken.py:6: AssertionError
========================= 1 failed, 1 warning in 7.98s =========================
This is a much richer failure than a plain assert, and learning to read it is the core skill:
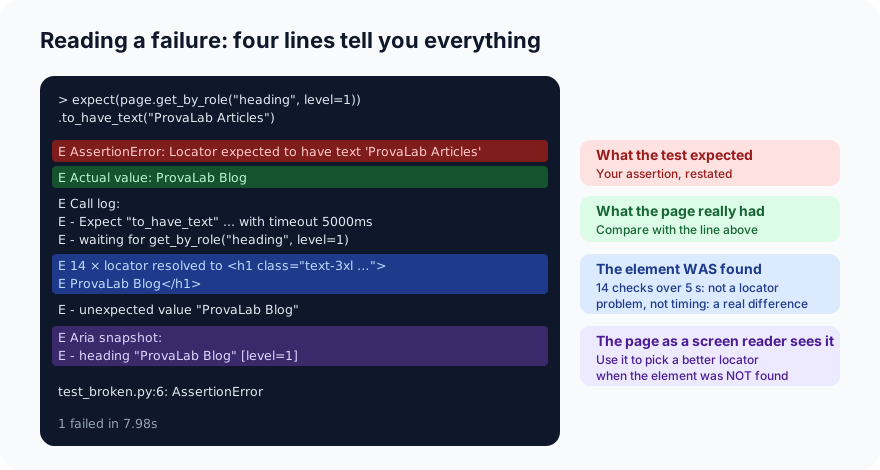
- Expected vs actual are on adjacent lines. Here the test is wrong, not the site.
- "14 × locator resolved to
<h1 …>" says Playwright found the element, checked it 14 times over 5 seconds, and it never had the expected text. So this isn't a timing or locator problem; it's a real difference. If the element had not been found, you'd see "waiting for …" with no resolution, and you'd know to fix the locator. - The aria snapshot shows the page the way a screen reader sees it. When your locator finds nothing, this list tells you what roles and names actually exist, so you can pick the right one.
Step 6: Record a trace (2 minutes)
A trace is a recording of everything the test did: every action, a screenshot before and after each one, the page's HTML, console messages and network calls. Keep one for every failure:
pytest test_broken.py --tracing retain-on-failure
1 failed, 1 warning in 6.59s
The trace lands in test-results/test-broken-py-test-blog-heading-wrong-on-purpose-chromium/trace.zip. Open it:
playwright show-trace test-results/test-broken-py-test-blog-heading-wrong-on-purpose-chromium/trace.zip
The trace viewer opens in a browser and lets you step through the test, see the page at each action, and inspect what was on screen when it failed. For a failure that only happens in CI, a trace is the difference between fixing it in five minutes and not being able to reproduce it at all.
Two related options, both worth adding to pytest.ini:
[pytest]
addopts = --base-url https://provalab.io --tracing retain-on-failure --screenshot only-on-failure
(--video retain-on-failure records a video too, at the cost of slower runs.)
Step 7: Run it in the pipeline (3 minutes)
The same tests, run on every change by GitHub Actions, with traces saved when anything fails:
name: ui-tests
on: [push, pull_request]

jobs:
  ui:
    runs-on: ubuntu-latest
    steps:
      - uses: actions/checkout@v4
      - uses: actions/setup-python@v5
        with:
          python-version: "3.12"
      - run: pip install pytest-playwright
      - run: playwright install --with-deps chromium
      - run: pytest --tracing retain-on-failure
      - uses: actions/upload-artifact@v4
        if: failure()
        with:
          name: playwright-traces
          path: test-results/
--with-deps installs the system libraries the browser needs on a fresh CI machine. The last step uploads the traces as a downloadable artifact whenever the run is red.
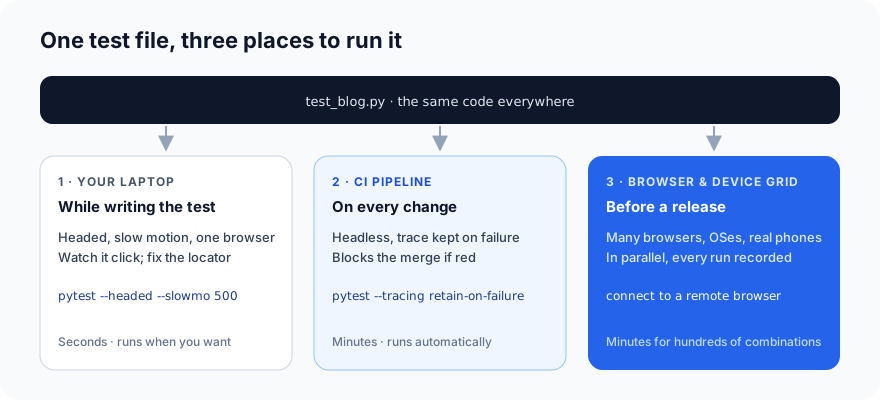
When you need more than one machine can give you, many browsers, operating systems and real phones at once, the same tests connect to a browser grid instead of a local Chromium. The test code doesn't change.
Handy options
| Command | What it does |
|---|---|
pytest --headed |
Show the browser window |
pytest --slowmo 500 |
Pause 500 ms between actions, so you can watch |
pytest --browser firefox |
Run in Firefox (after playwright install firefox); also webkit for Safari's engine |
pytest --browser chromium --browser firefox |
Run every test in both |
pytest --tracing on |
Record a trace for every test, not only failures |
pytest -k tour |
Run only tests with "tour" in the name |
playwright codegen https://provalab.io |
Click around a site and have Playwright write the locators for you |
codegen is a good way to learn the locator syntax: it records your clicks and suggests role-based locators, which you can then tidy up.
Habits worth keeping
- Prefer
get_by_roleandget_by_test_id. The#stage-tmsCSS selector in the third test is a reasonable exception: it's an ID set on purpose, and it narrows the search to one section. - Never
time.sleep(). If you feel the need, you're missing anexpect. - Each test starts from
page.goto()and sets up what it needs. No test should depend on another. - Keep traces on failure, always. They cost nothing when tests pass.
- Run headed when confused, headless everywhere else.
What's next
Our three tests all go through the user interface. In Part 3 we go one layer down: API testing, where the same checks run in milliseconds instead of seconds, and why many teams test the API before the UI.
ProvaLab's QA Infrastructure is the "third place" in the diagram above: your Playwright and Selenium tests run on real browsers and devices in the cloud, every session is recorded, and when a test fails the recording and logs go straight back to your coding agent. See it in the two-minute product tour.
Prefer to read offline? The whole Hands-On Testing series is one free PDF: get the PDF.
See ProvaLab working on a real app
Your coding agent runs the tests, reads the failures and fixes them.